Showing posts with label Google AdSense. Show all posts

10 Things For You Before Applying for Google Adsense

/*----Sidebar Left Post-----*/
[sidebar_left]
Google Adsense is world’s larges Ads Network and works at Pay Per Click system.You make little mistakes and get disapproved every time. Google Adsense paying rates are better than all of other networks which is the biggest reason it is so popular to all Bloggers and Webmasters. But since everybody is running behind them, they have made the approval system very strict.  So you need a complete guidance and list of thing that you need to do before applying for Google Adsense and supposing that you are ready.

Google Adsense approval


10 Things to Do Before Applying for Google Adsense


1. Privacy Policy :


Privacy is one of the common mistakes that every Blogger makes and that I made many times before finally getting approved. Even though there are people out there who say that having a Privacy Policy for a Blog doesn’t makes sense but they are wrong.
A Privacy actually describes to your readers about what they will get on your Blog , what they should do and what they should not. So obviously there is nothing bad in having a Privacy Policy. While it can affect somehow on your Adsense Approval, you must give it a try. You can write it yourself or find Privacy Policy Generators online (You don’t need a lawyer anyway).

2. About Page


An About page plays an important role. But when it comes to Adsense, they are about Zero chances of getting approved if you are not showing this page.About page simply describes about you and your Blog . This will not only help you establish a relationship with readers but it will also make them trust upon you.

3. Contact Us Page


What one of your readers likes may be bothering someone else. Than it is better to give them opportunity to speak up to you and tell how they feel about your Blog, what they want to be edited , what they liked or hated.
It will also show the Google Adsense Team that is viewing your site that you actually care about your readers and not only the money and Adsense.

4. Name/ Email Verification


Make sure to put you Name and Email address in some easily visible area like About Me and Contact Us pages. It will confirm to Google Adsense Team that it is the same person who applied for Adsense and not some spam, crappy bots.

5. Age Verification


In this step I encountered a problem. Instead of 18, I accidentally published my age as 17 while on Adsense Application Form, it was accurately 18.
Hence there started a problem . Because Google Adsense is not for under 18 people. I realized this problem after being disproved a few times without any legitimate reason. So I advice you to be accurate while typing your age.

6. Minimum Number of Posts


There is no exact answer. Not even one. Because I have seen very established Blogs with 400+ posts and their owner telling me that Google Adsense is rejecting them while somewhere ,people with 40,50 posts are enjoying making money. Exactly what I said that there is no actual answer. However, we can always predict things. According to my experience , you should only apply after you have more than 70 posts. Posts length should must be 500+ words too.
Read : Difference Between Short Length Post Vs Length Posts – What’s Best?

7. Design


Your Blog is the biggest thing after Content. This represents your expertise ,experience and Professionalism. So be careful because anything can kill your Chances.

8. Content Type


Be careful with what type of content you are publishing. Because it is something that truly matters. Google Adsense is not for Pornographic, Illegal Items, Drugs or other Blogs / Sites like that. Also Adsense team won’t be willing to allow you to step in if you own a Non English Blog. Having posts shorter than 300 words in length is also Red Signal.

9. Providing Value


Don’t complain about not making money and don’t clearly state that your are Blogging for Money only and have no other interest in it. Because this will show them that you will not be providing values to your readers any day. Hence another Red Light glows up.

10. Top Level Domain

12 Things to Do Before Applying for Google Adsense
Top level domains are very important for Adsenses.Those are gone far away when Adsense used to approve “Blogspot” and “WordPress.com” Blogs. As for today, you must have your own unique domain that specifies your Blog. If you don’t have one yet, stop dreaming about getting approved with Sub domains and go buy a Top Level Domain.
Another important thing about domain is it’s age. Because for most of Asian Countries, Adsense has placed an age restriction. They don’t accept any sites before they are 6 months old.
Why Is It Important To Add AdSense After <-Read More->

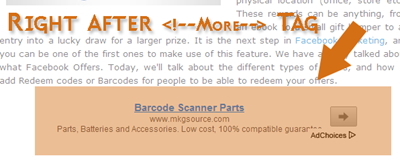
Adsense positioning in bloggerThis is a great tutorial which will multiply your current click through rate and add a new boom to your over all Adsense earning. With a big repository of plugins for Wordpress blogs like Quick Adsense, WP users never need to worry while adding Adsense to any part of the blog they wish but in blogger we lack plugins that could do the job automatically. Thanks our developer Ahmed Nasir the script developed this time will automatically insert your AdSense Ad right after the opening paragraph (Post summary) or the read more button (Jump Break). The read more link is distinguished by the HTML tag "<!--more-->" , we will use a simple Jquery code to tell the browser to append an Ad zone with a unique div ID, right before the more tag. In  browsers where JavaScript is disabled the Ad zone will instead display at the end of post. 

Update: I have disabled the Ad display for browsers where JavaScript is disabled. 


Installing the Script on Blogger

  1. Go to Blogger > Templates
  2. Backup your template
  3. Tick the "Expand Widget Templates" box
  4. Search for <head>
  5. Just below it paste the following JQuery code only if you are not yet using jQuery script on your blog

<script src='http://ajax.googleapis.com/ajax/libs/jquery/1/jquery.min.js' type='text/javascript'/>

     6.   Next paste the following code below <head> 

<script type='text/javascript'> 
$(document).ready(function(){ 

$(&#39;a[name=&quot;more&quot;]&#39;).before($(&#39;#MBT-google-ad&#39;).html()); 
$(&#39;#MBT-google-ad&#39;).html(&#39;&#39;); 

}); 
</script>


Optional: If you want to display the ad at two places i.e. below read more tag and also at the end of post then delete the highlighted yellow code. Also delete the yellow highlighted code from step#8 given  below 

    7.  Now search the following code: 

<data:post.body/>

      8.  Just below it paste the following code: 


<b:if cond='data:blog.pageType == &quot;item&quot;'> 
<div style="display:none;"><div id='MBT-google-ad'> 
<br/> 
<center> 
ADD ENCODED ADSENSE CODE HERE </center> 
<br/> 
</div></div>  </b:if> 


Replace the bolded text above with your Adsense code. Remember that the code that you copy from your Google Adsense Account must be first encoded inorder to work with blogger templates. Simply copy the code and then encode it using the following MBT tool. 

Copy the encoded code from MBT HTML encoder and then paste it on the bolded text that says: ADD ENCODED ADSENSE CODE HERE 

      9. Save your template and you are all done! 

Visit your blog and then visit any post page, you will see an Ad hanging just perfectly right after the first opening Summary paragraph. :) 

AdSense Publisher Scorecard: Best Tips & Tricks For Blogger in 2014


AdSense Publisher Scorecard

After an interesting Hangout with AdSense Folks on 18th June at Google+, Susan Wojcicki announced about an interesting new feature called Publisher Scorecard that has been added to all AdSense accounts and the scorecard summary chart can be seen under the Home Tab. 

Scorecard is a tool that gives greater insights to Publishers to compare how well their Ad settings, Website load time and content is performing compared to other Publishers using AdSense as the contextual Ad network. It displays a summary of three important categories which includes Revenue OptimizationSite Health and Google+ button Integration. Each category is scored on a scale of 1-5 blue dots that indicate your performance rank or level. In today's tutorial we will learn every basic detail of this great scoring tool and will learn how to optimize our websites and blogs to increase the overall AdSense earning. 


What are the Scorecard Categories?


Adsense scorecard categories 2014
Above is a screenshot of my AdSense Account. You can clearly see the three important bolded categories which are further divided into sub categories:

1. Revenue Optimization:


By Revenue Optimization we mean improving anything that increases your overall Page CTR and RPM value and boost your earning. We received two 2/5 blue dots here and a yellow icon that indicates that this section needs improvement. It can be optimized by making three major improvements and that are:
 

(a) Using Recommended Ad formats 

These recommended formats are often 336x280, 300x250, 728x90 or 160x600. If you are running any Ad formats other than these then please upgrade them immediately.


How to Improve it?


To improve this section use recommended ad formats that I mentioned above and you must keep your Ads above the fold. I would suggest to keep a 336X280 Text/Image Ad just belowBlog Post tiles and a 728x90 big banner just below your blog header. Add a 160X600 skyscraper to your Sidebar.
Please make sure to keep your web design such that these ads may appear above the fold. The visitor must see the ads when your site loads without having to scroll down. Use the following App by Google to test if your ads are above the fold or not:
Adsense best Ad Locations
We recently developed a Plugin called AdSense Booster to add AdSense ads just above the excerpt/read more tag. This plugin was developed for blogger blogs. But you can get the same functionality even in wordpress by installing Quick AdSense Plugin.  I must tell you that our earnings increased by 40% after we installed this simple plugin which is now available to even blogger users and we are using the same plugin to  show a 468 X 60 Ad just below the opening paragraph. You can see it live in this post just below the first paragraph.


(b) Enabling both Text and Image Ads on this formats. 

I would suggest that you must enable this if you haven't already done. AdSense bot knows best when to display Text or Media Ad based on the content on your site. If you are choosing just text ads or image ads then you are loosing the opportunity of an optimized Click through Rate.


How to Improve it?


Go To My Ads Tab inside your AdSense account and then click the "Edit ad Type" link below your Content Ad units. Choose the option Text & image/rich media ads as shown below:

 
text and image ads in adsense
Do this for all your AdSense for content Ad zones. 

(c) Reduce Crawler Errors


This is one major section which people often underestimate and this returns in low earning. I always strongly recommend our clients to do a through validation of both their site HTML structure and robots.txt file. You must let the AdSense bot to crawl and scan your content the easiest way possible and don't block its way with Messy Fancy Scripts.

If you check our scorecard we received a green Tick which shows an  Excellent Score. To reduce crawler errors first make sure all Jquery scripts that you use are placed within the <head> and </head> tags. Clean up your site HTML structure and remove  any script that is increasing your site speed and causing the browser to crash.

Google has a list of crawlers for different tasks such as for detecting images, videos, smart phones or AdSense Ads. In order to make sure you allow AdSense Googlebot to crawl your site you must give it rights to do so by adding the following line in your robots.txt file:

User-agent: Mediapartners-Google
Disallow: 


See our robots.txt file as an example.
Note: Blogger users have this added by default. Wordpress users may manually add this. 

2. Site Health


Here as usual Google expects you to improve your Page speed Performance. Matt Cutts did announce on April 2010  that Page Load time would be a deciding factor for websites to rank higher on SERPs. They went so far that they even introduced PageSpeed tools last year which helps you to reduce load time of your webpages. 

Yes we score too bad here as we received a red alert. Which of course is justified because I love the blog to look professional and stand apart. Here we have never listened to Google because we tried our level best to reduce the load time but Google never seemed like getting satisfied! :p I guess we would need to remove some further widgets and images to cut down the Page Load time.


How to Improve it? 


Here are some quick and proper ways to reduce load time: 


  • Use CSS3 features to  create backgrounds, gradients, drop shadows and don't use Images. Create elements using CSS3 as much as you can.
  • Use small image patterns for backgrounds and scroll them vertically or horizontally instead of using large and big images
  • Use CSS Sprites to reduce http requests. You will find severa
  • Place all Javascript in one place and one file
  • Place all stylesheets in one linked file
  • Remove useless Plugins and Widgets
  • Never compress CSS nor JavaScript! Even I used to recommend this before but when we talk of site maintenance you will get confused figuring out the compressed code. So please never make a mess out of your code. Keep it well indented and structured.

3. Integrate Google+ Button on your sites


Well how can Google forget promoting their Social network. So yes you must make sure to add Google+ buttons on your site to ensure you get maximum number of +1 recommendations because believe it or not social sharing votes does count a lot..

How to Improve it?


Simply add a GooglePlus button inside your posts and your sidebar. Also create a Google+ Fan Page. Read the following delicious tutorial to get things going.
  • Add Google+ Button to your site
  • Create a Google+ Fan Page
  • Create Google+ Business Page  - Optional

Scorecard Symbols and Indicators


Following are some interesting details about the various symbols used in your scorecard chart. You can find more help and details on scorecard at Google Groups

1. Following are the three important Scores symbols and their description 
Score  Description
excellent scorecardExcellent! No need to make any changes to this category.
improvements needed - scorecardImprovements suggested. You are advised to make some further improvements to this item.
needs improvement - scorecardNeeds improvement! You must or may take quick action to optimize this item

2. Following are some symbols that would appear after you make the suggested changes.
      Symbol
Meaning
increase in blue dots - scorecardThis category’s score has increased by one or more blue dots up to four blue dots.
decrease in blue dots - scorecardThis category’s score has drop down by one or more blue dots down to three blue dots.
item score improvementThis item’s score has gone up from “Needs improvement” to “Improvements suggested”.
item score gone downThis item’s score has gone down from “Improvements suggested” to “Needs improvement”.


Need Help?


I guess we covered every single tip and almost all best practices used to make sure you monetize your sites well and improve your CTR and RPM value. If there is anything we emphasize a lot to our clients after SEO then it's the site Design and then Monetization. Please give extra care to how appealing your site design is. You have the right to make it eye-catching by using all Fancy Jquery effects but please be assured that sometimes you need to sacrifice for the sake of a bigger gain. This is one reason why Wikipedia is so ugly yet so powerful.